Z-Image Turbo can benefit from using LoRAs, whether you are working with the official workflow or using the GGUF workflow for low VRAM setups. Despite being a very recent model, there are already many LoRAs available online that are ready to download and use. In this guide, you will learn where to find the best Z-Image LoRAs and how to use them in your workflows.
Where to Download the Best Z-Image Turbo LoRAs
The best place to find Z-Image LoRAs right now is Civitai. Visit the link below and apply the following filters (the filter tab is located in the top-right corner): Models > LoRA, Base Model > Z-Image Turbo. If you do not apply these filters, you will see LoRAs that are not compatible with Z-Image, so make sure to use them.
How to Use LoRAs with Z-Image in ComfyUI
If you are using the official ComfyUI workflow version 4 or newer, the LoRA node is already included by default. It also comes with a pixel art style LoRA so you can test it immediately. If you want to use a different one, you will first need to add additional LoRAs to the software, which is explained later in this guide.
LoRAs usually include specific “trigger words” that must be added to your prompt for the LoRA to be applied correctly. They also allow you to control the LoRA’s influence using a value between 0 and 1. The closer the value is to 1, the stronger the LoRA’s effect will be.
How to Use LoRAs with Z-Image GGUF
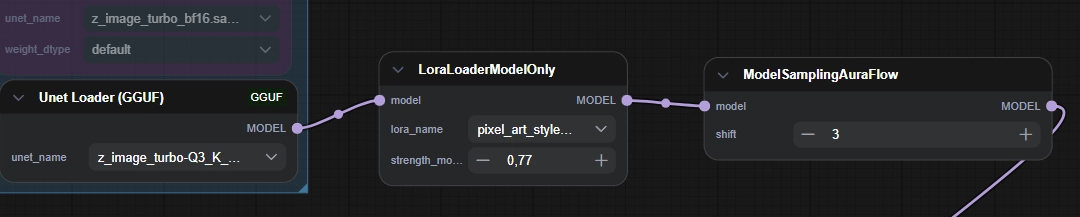
If you are using a low VRAM device, you will be working with a different workflow that requires adding an extra node to use LoRAs. The process is very simple:
- Double-click anywhere on the workflow background.
- Search for “lora” and select the node called “LoraLoaderModelOnly” to add it to the workflow.
- Inside the node, select the LoRA you want to use from the dropdown menu and adjust its influence by changing the value from 1.
- Disconnect the “Unet Loader (GGUF)” node from the “ModelSamplingAuraFlow” node.
- Connect “Unet Loader (GGUF)” to “LoraLoaderModelOnly”, then connect that node to “ModelSamplingAuraFlow”. The final setup should match the image below.
That’s it. Your workflow is now ready to be used with LoRAs. Remember that you must include the LoRA’s trigger words in your prompt for it to be applied correctly.
How to Add New LoRAs to ComfyUI
This step is very simple. Just place the LoRA files you download into the following folder: ComfyUI/models/loras.
After adding a new LoRA to the folder, press the “R” key so the software refreshes and detects the new file.
To switch between different LoRAs, simply click on the LoRA name inside the LoRA node. A dropdown menu will appear showing all available LoRAs stored in the corresponding folder.